Expansion joints are the unsung heroes of parking lot durability. Acting as the connective tissue that allows concrete slabs to expand and contract with temperature changes, these joints are vital for preventing cracks and potholes. Yet, when they fail, the integrity of your parking facility might be at risk. Understanding the art of expansion joint repair can save you from future headaches and unnecessary expenses. Whether you’re a property manager, a maintenance technician, or a DIY enthusiast, mastering the basics of expansion joint repair is an essential part of parking lot upkeep.
Table of Contents
The Role of Expansion Joints in Parking Lot Design
Imagine a parking lot as a living, breathing entity that continually expands and contracts. The expansion joints are critical in accommodating these movements, preventing the concrete slabs from cracking under stress. Each joint is strategically installed to absorb vibration, handle the heavy load of vehicles, and react to environmental factors like temperature changes and moisture. Not just any space between slabs, expansion joints are engineered solutions designed to last as long as the parking lot itself—when well-maintained. The absence, or failure, of these joints can lead to significant structural damage, which may even spread beyond the parking lot, impacting nearby buildings and infrastructure.
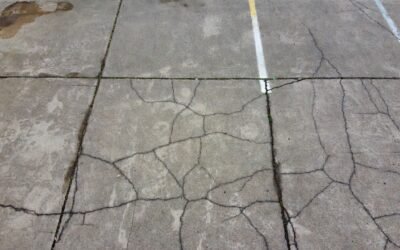
The Warning Signs of Faulty Expansion Joints
Spotting a failing expansion joint early on can save you significant repair costs down the line. Warning signs include:
- Visible cracks or gaps in the joint
- Splintering or fraying edges of the joint material
- Pooled water or debris trapped in the joint
- Uneven concrete slab surfaces around the joint
Ignoring these signs may lead to accelerated deterioration of your parking lot, which in turn could necessitate more comprehensive and expensive repairs. Thus, regular inspection of expansion joints should be part of every maintenance checklist.
Common Causes of Expansion Joint Damage
Weather-Related Wear and Tear
Canadian parking lots face a gauntlet of weather conditions—from the scorching heat of summers to the freezing clutches of winters. This extreme variation in temperature causes the concrete slabs to expand and contract repetitively, putting stress on the expansion joints. Add to that the effects of precipitation and de-icing salts, and you have a recipe for degradation. The constant freeze-thaw cycles can particularly be damaging, as water seeps into small crevices, freezes, expands, and then widens the gaps further upon melting.
Vehicle Load and Traffic Patterns
Another common culprit for joint damage is the very reason parking lots exist—vehicles. The continuous movement and pressure from cars, especially heavier ones like SUVs and trucks, can lead to the mechanical breakdown of the joint material over time. Additionally, specific traffic patterns, where the majority of vehicles follow the same path, can create uneven wear, leaving some joints to bear a disproportionate amount of stress.
Recognizing these factors is pivotal in both addressing current issues and preparing for future maintenance. Appropriate repair and material selection are directly influenced by the understanding of these common causes of damage—knowledge that empowers you to extend the life of your parking lot’s expansion joints.
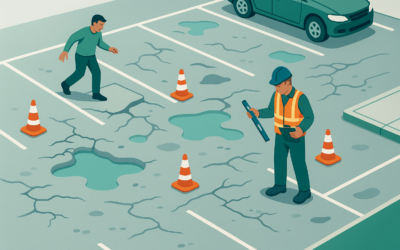
Assessing the Damage to Expansion Joints
Before diving into repairs, a thorough assessment of the damage to your parking lot’s expansion joints is crucial. This step will guide your repair strategy and ensure that you apply the correct solutions to specific problems. Remember that a misdiagnosed issue can lead to even further damage. So, let’s break down the process of assessing your expansion joints.
How to Inspect Your Parking Lot’s Expansion Joints
The inspection process begins with a visual assessment. Take a walk through the parking lot and observe the condition of the joints. Make a note of any visible signs of wear, such as cracking, flaking, or missing pieces of the joint sealant. Document these areas with photographs – they can be helpful when discussing repair options with contractors or for future reference. This walkthrough can give you a sense of the scope of repair work needed.
Next, conduct a more detailed investigation. Use tools such as a ruler or a gauge to measure the width and depth of the gaps or cracks. This level of scrutiny is not just about identifying damage but about quantifying it. Knowing the exact extent of the damage will assist in the selection of appropriate repair materials and methods.
After the physical assessment, consider the age of your parking lot and the last time the expansion joints were serviced. Historical data can provide insights into the expected lifespan of the materials used and the urgency of repairs needed.
For a complete assessment, it’s advisable to consult a professional. A trained eye may catch subtle signs of damage that untrained individuals might overlook. Utilizing ultrasonic tests, professionals can detect voids beneath the surface that could compromise the joint’s functionality. Such preemptive identification of hidden problems can prevent costly, large-scale repairs in the future.
Key Takeaway:Regular, thorough assessments of expansion joints are essential, as they allow for timely, targeted repairs, maintaining the safety and longevity of your parking lot.
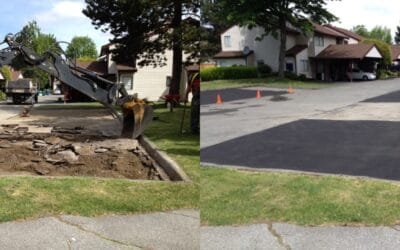
Preparing for Expansion Joint Repair
Successful repair of expansion joints begins with preparation. After confidently assessing the damage, making sure you’re set up with the proper safety measures, tools, and materials is the next critical step. Adequate preparation not only enhances the efficiency of the job but ensures that the repair will last, saving you from repeated fixes in the future.
Safety Tips and Precautions
Before you start the repair, it’s paramount to consider the safety of yourself and others. Equip yourself with personal protective equipment (PPE) such as safety goggles, gloves, and a dust mask to avoid exposure to harmful debris and chemicals. If you’re working in a public area, use cones and caution tape to section off the repair site and ensure that the parking lot users are directed away from the work area.
Required Tools and Materials
Equipping yourself with the right tools and materials is a game-changer. For basic repairs, you’ll need:
- Cleaning equipment (brooms, vacuums, pressure washers)
- Removal tools (plows, chisels, hammers)
- Sealant application tools (caulk guns, spatulas)
- Appropriate joint sealant material
- Backer rod material for deeper joints
A precise list of materials will vary depending on the nature of the damage and the repair method chosen. Always refer to the manufacturer’s guidelines when selecting materials, as using incompatible products can lead to premature joint failure.
Lastly, set aside enough time to complete the repair without rushing. Properly repairing expansion joints is not a task that should be hurried. Hurrying can lead to cutting corners and ultimately, a failed repair job.
Fun Fact: In Canada, where the weather can vary significantly, expansion joints in parking lots can move as much as several centimeters throughout the year. This flexibility is what keeps the concrete intact during extreme temperature swings.
Step-by-Step Guide to Expansion Joint Repair
Now that you’re armed with the right tools, materials, and safety equipment, let’s walk through the actual process of repairing an expansion joint. These steps are intended for minor to moderate repairs that do not require the expertise of a structural engineer.
Cleaning and Preparing the Joint Area
Start by cleaning the joint thoroughly. Any dirt, debris, or old sealant material can prevent the new sealant from adhering correctly. Use a broom or a vacuum to remove loose particles, and for tougher build-up, a pressure washer or a wire brush may be necessary. Ensure the joint is dry before proceeding to the next step, as moisture can affect the curing of some sealants.
Selecting the Right Filler Material
Select a filler material that’s compatible with your parking lot’s conditions and the expected range of motion of the joints. The material should be able to withstand temperature changes and traffic load. For most parking lots, a flexible, traffic-grade polyurethane or silicone-based sealant is a popular choice.
Applying the Sealant and Ensuring Proper Adhesion
For deeper joints, insert a backer rod to the appropriate depth to provide support and control the sealant’s depth. Apply the sealant using a caulk gun, making sure to fill the joint completely and uniformly. Use a spatula or a tool to smooth out the surface and remove any excess material. Respect the sealant’s ‘wet time’ and ensure it’s level with the concrete surface to prevent pooling water.
Finishing Touches and Curing Time
After applying the sealant, give it the curing time recommended by the manufacturer. Avoiding traffic on the repaired area during this time is essential to prevent damage before the sealant has fully set. Once cured, perform a final inspection to ensure the joint’s surface is flush with the concrete, and there are no gaps or bubbles.
Key Takeaway:Attention to detail is critical in each step of the repair process. Proper joint cleaning, choosing the right sealant, and respecting curing times are all vital to achieving a long-lasting repair.
Professional vs. DIY Expansion Joint Repair
When it comes to repairing expansion joints in parking lots, property owners often ponder whether to tackle the project themselves or to call in professional help. The decision can influence not only the quality and durability of the repair but, more importantly, the safety and longevity of the parking lot itself. Let’s evaluate both options.
When to Call in the Pros
Professional intervention is recommended when:
- The damage is extensive or complex.
- There is structural damage to the slabs surrounding the joints.
- You lack the proper tools and expertise to make the repair.
- There is a need for traffic management during the repair process.
Expertise in handling specialized materials and equipment ensures that pros will likely deliver a more durable and reliable fix. Moreover, they can often provide a warranty on the work performed, offering you peace of mind.
Tips for Successful DIY Repair
If you’re considering a DIY approach, keep in mind:
- Invest in quality materials and carefully follow the manufacturer’s instructions.
- Never rush the prep work – a clean, well-prepared joint is essential for a good repair.
- Be meticulous in your technique to ensure proper adhesion and finish.
DIY can be cost-effective and gratifying, but it’s vital to assess your abilities realistically and understand the potential for costly mistakes.
Preventative Measures for Expansion Joint Durability
To ensure the longevity and effectiveness of expansion joints in parking lots, preventative maintenance is indispensable. Anticipating wear and taking proactive steps can substantially extend the life of joint sealants and the concrete slabs they connect. Here’s how to keep those joints in top condition:
Regular Maintenance Best Practices
Implementing a schedule for regular inspection and maintenance of expansion joints can prevent minor issues from escalating. Actions to include in routine checks are:
- Cleaning debris from the joint area to prevent buildup.
- Monitoring for early signs of wear, such as small cracks or sealant degradation.
- Applying sealant touch-ups if needed, to avoid more significant repair work down the line.
Also, ensure that nearby drainage systems are functioning correctly to prevent water accumulation, which can exacerbate joint damage.
Advancements in Expansion Joint Technology
New materials and designs are continually being developed to improve the resilience and life span of expansion joints. For instance, advanced polymers and hybrid sealants offer enhanced flexibility and durability compared to traditional materials. When it’s time for replacement or repair, consider opting for these innovative solutions to benefit from their superior performance over time.
Key Takeaway:A stitch in time saves nine. Regular maintenance and staying updated with technological advancements can save substantial repair costs and extend the life of your parking lot.
The Cost of Expansion Joint Repair
Cost is a significant consideration when planning for expansion joint repairs in a parking lot. Understanding the factors that influence the overall expense will help in budgeting and decision-making. Let’s break down the cost considerations for repair projects.
Budgeting for Repair Projects
The cost of repairing expansion joints will vary depending on the extent of damage, materials chosen, and whether you opt for a professional service or a DIY approach. Here are some elements that will affect your budget:
- Size of the area needing repair.
- Type of sealant and backer rod materials.
- Labour costs if hiring professionals.
- Additional equipment rental if required.
Keep in mind that while DIY repairs might seem cheaper upfront, there’s a risk of future costs if the repair isn’t performed correctly.
Long-term Cost Savings of Proper Maintenance
An essential aspect of cost that shouldn’t be overlooked is the long-term savings associated with proper maintenance. By investing in regular inspections and minor repairs, you can avoid large-scale reparative work and the associated costs. Furthermore, well-maintained joints can extend the overall life of your parking lot, postponing the need for complete overhauls.
Repair Cost Breakdown
| Repair Cost Component | Description | Estimated Cost (CAD) |
|---|---|---|
| Materials | ||
| – Joint Sealant | Flexible polyurethane or silicone-based sealant | $50 – $100 per 10 tubes |
| – Backer Rod | Foam rod for deep joint filling | $10 – $30 per roll |
| – Cleaning Supplies | Broom, vacuum, pressure washer rental | $50 – $150 |
| – Protective Gear | Gloves, goggles, dust mask | $20 – $50 |
| Tools | ||
| – Caulk Gun | Tool for applying sealant | $10 – $30 |
| – Spatula | For smoothing sealant | $5 – $15 |
| – Measuring Tools | Ruler or gauge for measuring cracks | $10 – $25 |
| Labor | ||
| – DIY Labor | Estimated hours and personal time cost | Variable (time cost) |
| – Professional Labor | Hiring a professional repair service | $200 – $500 per hour |
| Additional Costs | ||
| – Disposal Fees | Proper disposal of old sealant and debris | $50 – $100 |
| – Traffic Control | Cones, safety tape, signs | $20 – $50 |
| Total Estimated Costs | $425 – $1,200 |
Troubleshooting Common Repair Issues
Even with the best efforts, repair work on expansion joints can sometimes present complications. Let’s explore some common problems that may arise and how to handle them, ensuring that a small hiccup doesn’t turn into a significant setback.
Dealing with Unexpected Complications
Encountering unforeseen issues during repair is not uncommon. For example, during the repair process, you might uncover more severe damage than initially expected, such as deep voids beneath the slabs or extensive substrate erosion. If faced with such situations, it is essential to reassess the repair strategy. Depending on the severity, this may be the time to halt DIY efforts and seek professional assessment and intervention to prevent future safety hazards.
Another possible complication is the curing process. In some instances, the sealant may not set as expected. This can happen due to incorrect application, incorrect curing temperatures, or using expired or improper sealant material. Whenever you’re in doubt, refer back to the product’s datasheet for troubleshooting tips or reach out to the manufacturer for advice.
The Importance of Proactive Maintenance
In closing, expansion joint repair in parking lots is not merely about fixing a current issue; it’s an investment in the future integrity of the entire parking structure. By understanding the vital role of these joints, regularly assessing their condition, repairing them carefully when needed, and adopting preventative maintenance strategies, your parking lot can serve as a safe and reliable asset for years to come. Remember that timely action is key—tackling small problems now can save you from much larger, more expensive ones later.
Remember: A parking lot is the first thing users experience when visiting a property. Keeping it in prime condition with well-maintained expansion joints sets the tone for the rest of the property’s upkeep and safety standards.
FAQs
- What are the legal implications of neglected expansion joint repairs in parking lots?
In Canada, property owners have a legal responsibility to maintain safe conditions on their premises. Neglecting expansion joint repairs can lead to accidents and damage to vehicles, potentially resulting in liability for the owner. It is essential to address damages promptly to comply with safety regulations and avoid legal complications. - How often should expansion joints be inspected and repaired?
Inspection frequency can depend on various factors, including climate, traffic volume, and the age of the parking lot. As a general rule, inspect the expansion joints at least twice a year, in the spring and fall, to identify any damage from temperature fluctuations and repair as necessary. - Can damaged expansion joints cause accidents or harm to vehicles?
Yes, damaged or deteriorated expansion joints can create uneven surfaces and tripping hazards for pedestrians, and can cause alignment issues or tire damage to vehicles. Ensuring that these joints are in good condition is crucial for parking lot safety. - Are there environmentally friendly options for expansion joint materials?
Eco-friendly options are available, such as sealants made from renewable resources or with lower volatile organic compound (VOC) emissions. Always check product specifications to ensure that you’re choosing the most sustainable option without compromising on performance. - What is the average lifespan of a repaired expansion joint in a parking lot?
The lifespan of a repaired expansion joint depends on the materials used, the quality of the repair, and environmental factors. On average, a well-repaired joint using high-quality materials can last anywhere from 5 to 10 years. Consistent maintenance can help reach or extend this range.