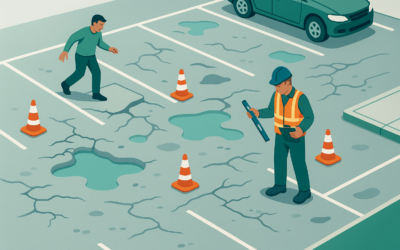
Why Parking Space Striping Maintenance Is Essential
Maintaining clear and well-defined parking space striping is crucial for ensuring safety, enhancing the visual appeal of your property, and complying with legal requirements.
Table of Contents
Keeps Traffic Flow Organized and Safe
Clear and visible parking lot lines are essential for directing drivers and pedestrians safely throughout the parking area. They delineate parking spaces, guide traffic flow, and highlight pedestrian crossings, reducing confusion and minimizing the risk of accidents. Proper striping helps prevent vehicles from parking haphazardly, which can obstruct traffic lanes and create hazardous conditions for both drivers and pedestrians.
Enhances Curb Appeal and Customer Experience
A freshly striped parking lot conveys a sense of professionalism and attention to detail. It creates a positive first impression for customers, clients, and visitors, signaling that the property is well-maintained and cared for. This attention to the exterior appearance can influence customer perceptions and contribute to a more inviting and organized environment.
Ensures ADA and Bylaw Compliance
Adhering to the Americans with Disabilities Act (ADA) and local regulations is not only a legal obligation but also a demonstration of inclusivity and accessibility. Proper striping ensures that accessible parking spaces are correctly marked with the required dimensions, signage, and access aisles. For instance, ADA standards specify that accessible parking spaces must be at least 96 inches wide with a 60-inch access aisle, and van-accessible spaces require additional width and signage. Regular maintenance of these markings is essential to remain compliant and to provide safe access for all individuals.

By prioritizing regular maintenance of parking space striping, property owners can ensure a safer environment, enhance the property’s appearance, and remain compliant with legal standards.
How Long Do Parking Lines Typically Last?
The longevity of parking lot striping depends on the type of paint used, environmental conditions, and maintenance practices. Understanding these factors can help in planning regular maintenance and ensuring safety and compliance.
Expected Lifespan by Paint Type
Different paint types offer varying durability:
- Water-Based Acrylic Paint: Typically lasts 1–3 years. It’s eco-friendly and suitable for areas with moderate traffic.
- Thermoplastic Paint: Offers a lifespan of 3–5 years. It’s durable and ideal for high-traffic areas.
- Epoxy Paint: Lasts about 4–7 years. Known for its strong adhesion and resistance to chemicals.
- Methyl Methacrylate (MMA) Paint: Can last up to 8 years. It’s highly durable and resistant to UV rays and chemicals.
External Factors That Cause Faster Wear
Several external elements can accelerate the fading and deterioration of parking lot lines:
- Traffic Volume: High traffic areas experience more wear, leading to quicker fading.
- Weather Conditions: Extreme temperatures, UV exposure, rain, and snow can degrade paint quality.
- Surface Cleanliness: Dirt, oil, and debris can prevent proper paint adhesion, reducing longevity.
- Surface Condition: Cracked or uneven surfaces can cause paint to wear unevenly and peel.
Signs You Need Restriping Soon
Regular inspections can help identify when restriping is necessary:
- Faded or Discolored Lines: When lines lose their brightness and contrast.
- Peeling or Cracking Paint: Indicates the paint is deteriorating and needs replacement.
- Reduced Visibility at Night: Reflective elements are no longer effective.
- Increased Accidents or Confusion: Drivers and pedestrians are unsure of traffic flow due to unclear markings.

Regular maintenance and choosing the appropriate paint type based on traffic and environmental conditions can extend the life of parking lot striping, ensuring safety and compliance.
When Is the Best Time to Repaint Parking Lines?
Timing your parking lot restriping correctly ensures optimal paint adhesion, longevity, and minimal disruption to daily operations.
Weather Conditions That Help Paint Bond
For the best results, schedule restriping during periods with favourable weather conditions:
- Temperature: Aim for ambient and surface temperatures between 50°F and 85°F (10°C to 29°C). These temperatures facilitate proper paint adhesion and curing.
- Dry Conditions: Ensure the pavement is dry before painting. Avoid days with rain forecasts, as moisture can hinder paint adherence and longevity.
- Low Humidity: High humidity can prolong drying times and affect the quality of the finish.
Spring and early summer are often ideal, offering moderate temperatures and lower precipitation levels. Early fall can also be suitable, provided temperatures remain within the optimal range.
Planning Around Business or Tenant Schedules
To minimize disruptions:
- Off-Peak Hours: Schedule restriping during times of low activity, such as overnight or weekends, to reduce interference with daily operations.
- Seasonal Considerations: Align restriping with periods of reduced business activity. For instance, retail businesses might choose post-holiday seasons, while schools might opt for summer breaks.
- Advance Notice: Inform tenants, employees, or customers ahead of time about scheduled maintenance to ensure cooperation and safety.
By carefully selecting the timing for restriping, businesses can ensure the longevity of the markings while maintaining smooth operations.
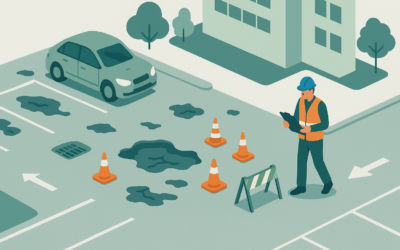
Step-by-Step Surface Preparation
Proper surface preparation is crucial for ensuring that parking lot striping adheres correctly and lasts over time. Neglecting this step can lead to premature fading, peeling, and the need for frequent repainting.
Clean Off Oil, Debris, and Rubber Marks
Begin by thoroughly cleaning the parking lot surface to remove contaminants that can prevent paint from adhering properly.
- Manual Sweeping: Use stiff-bristled brooms to remove loose debris, such as leaves, dirt, and gravel.
- Mechanical Sweeping: For larger areas, employ mechanical sweepers to efficiently clear the surface.
- Pressure Washing: Utilize high-pressure water to eliminate stubborn stains, including oil spills and rubber marks. This method is effective for deep cleaning and preparing the surface for painting.
- Degreasers: Apply commercial-grade degreasers to treat oil and grease spots, ensuring a clean surface for paint application.
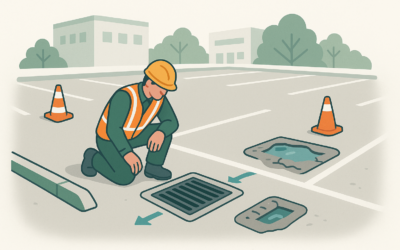
Repair Cracks and Potholes First
Addressing surface imperfections is essential before striping:
- Crack Cleaning: Remove dirt and vegetation from cracks using wire brushes or specialized cleaning machines.
- Crack Filling: Fill cleaned cracks with appropriate sealants to prevent water infiltration and further deterioration.
- Pothole Repair: Clean out debris from potholes and fill them with suitable patching materials, ensuring a smooth and level surface.
Ensure Surface Dryness Before Painting
Before applying paint, confirm that the pavement is completely dry:
- Turn Off Sprinklers: Disable any nearby irrigation systems at least 12 hours before painting to prevent moisture accumulation.
- Weather Check: Ensure no rain is forecasted and that humidity levels are low to facilitate proper drying.
- Drying Time: Allow sufficient time for the surface to dry after cleaning, especially if pressure washing was used.
This image illustrates the process of power washing a parking lot to remove contaminants before striping.
| Pavement Type | Recommended Cleaning Method | Notes |
| Asphalt | Pressure washing with degreaser | Effective for removing oil stains and debris |
| Concrete | Mechanical sweeping and pressure washing | Ensures removal of dust and surface contaminants |
| Gravel | Mechanical grading and compaction | Necessary to create a stable surface for striping |
By meticulously preparing the parking lot surface through cleaning, repairing, and ensuring dryness, you set the foundation for durable and long-lasting striping that enhances safety and aesthetics.
Choosing the Right Striping Paint
Selecting the appropriate striping paint is crucial for ensuring the longevity, visibility, and compliance of your parking lot markings. The choice between different types of paints and additives can significantly impact the durability and effectiveness of the striping.
Water-Based vs. Solvent-Based Paints
Understanding the differences between water-based and solvent-based paints can help you make an informed decision:
Water-Based Paints
- Pros:
- Environmentally friendly with low volatile organic compounds (VOCs)
- Minimal odour and easier cleanup with water
- Quick drying under optimal conditions
- Cons:
- Less durable in high-traffic areas
- May require more frequent reapplication
Solvent-Based Paints
- Pros:
- More durable and resistant to wear
- Better adhesion to pavement surfaces
- Cons:
- Higher VOC content, leading to stronger odours
- Requires solvents for cleanup
- May be restricted in some regions due to environmental regulations
When choosing between these options, consider factors such as environmental impact, durability requirements, and local regulations.
Using Reflective or Thermoplastic Additives
Enhancing the visibility and longevity of parking lot markings can be achieved through the use of reflective materials and thermoplastic additives:
Reflective Additives
- Incorporating glass beads into the paint can significantly improve nighttime visibility by reflecting headlights back toward drivers.
- These beads are often applied on top of wet paint to embed them into the surface, enhancing reflectivity.
Thermoplastic Additives
- Thermoplastic markings are created by heating a mixture of resins, pigments, and glass beads, then applying it to the pavement.
- Advantages:
- Exceptional durability, often lasting several years
- Superior resistance to wear and weather conditions
- Enhanced reflectivity due to embedded glass beads
- Considerations:
- Higher initial cost compared to traditional paints
- Requires specialized equipment and application techniques
Thermoplastic markings are particularly suitable for high-traffic areas where longevity and visibility are paramount.
By carefully selecting the appropriate paint type and considering the use of reflective or thermoplastic additives, you can ensure that your parking lot striping remains effective, compliant, and visually appealing over time.
Proper Striping Application Techniques
Applying parking lot striping with precision ensures safety, compliance, and longevity. Understanding the methods and standards involved is crucial for achieving professional results.
Manual Striping vs. Striping Machines
Choosing between manual striping and using striping machines depends on the project’s scale and desired precision:
- Manual Striping: Involves using tools like paint rollers or brushes. Suitable for small areas or touch-ups but can be time-consuming and less consistent.
- Striping Machines: Offer efficiency and uniformity, especially for larger projects. Options include:
- Walk-Behind Stripers: Ideal for projects requiring maneuverability, such as curves and short lines. They operate at speeds of 2 to 4 km/h and are suitable for smaller lots.
- Self-Propelled Stripers: Best for extensive areas, providing faster application and reducing operator fatigue. However, they may be less maneuverable in tight spaces.
A striping machine ensures straight, consistent lines for professional parking lot markings.
Line Thickness and Spacing Standards
Adhering to standard dimensions ensures compliance and optimal space utilization:
- Line Width: Standard parking stall lines are typically 4 inches wide, while accessible parking stall lines should be at least 6 inches wide.
- Parking Space Dimensions: Standard spaces are usually 9 feet wide by 18 feet long. Compact spaces may be 7.5 to 8.5 feet wide by 15 to 16 feet long.
- Aisle Width: Aisle widths vary based on parking angle and traffic flow but typically range from 14 to 24 feet.
Ensuring these standards are met is vital for safety and accessibility.
Importance of Dry Time and Curing
Proper drying and curing times are essential to prevent premature wear and ensure durability:
- Drying Time: Most traffic paints dry to the touch within 30 minutes, but it’s advisable to wait at least one hour before allowing vehicle traffic.
- Curing Time: Full curing can take up to 24 hours, depending on factors like temperature and humidity. High humidity and low temperatures can extend drying times.
- Best Practices: Schedule striping during optimal weather conditions—moderate temperatures and low humidity—to ensure proper drying and curing.
Adhering to these guidelines helps maintain the integrity and appearance of parking lot markings over time.
How Often Should You Repaint?
Regular maintenance of parking lot striping is essential to ensure safety, compliance, and aesthetics. The frequency of repainting depends on various factors, including the type of lot, traffic volume, and environmental conditions.
General Timelines by Lot Type
Different types of parking lots experience varying levels of wear and tear, influencing how often they should be restriped:
- Retail and Commercial Lots: High-traffic areas like shopping centers and office complexes typically require restriping every 12 to 18 months to maintain visibility and organization.
- Industrial Facilities: Manufacturing plants and warehouses, which often have heavy machinery and frequent vehicle movement, may need restriping annually to ensure safety and compliance.
- Residential Complexes: Apartment buildings and condominiums usually experience moderate traffic, allowing for restriping every 2 to 3 years, depending on the condition of the markings.
- Low-Traffic Areas: Facilities with minimal vehicle movement, such as certain institutional or rural locations, might only require restriping every 3 to 5 years.
It’s important to note that these timelines are general guidelines. Regular inspections can help determine the optimal schedule for your specific lot.
Indicators for Seasonal Touch-Ups
Beyond the standard timelines, certain signs indicate the need for seasonal touch-ups:
- Faded or Blurred Lines: If parking lines are no longer clearly visible, especially at night or during adverse weather conditions, it’s time for a touch-up.
- Increased Parking Violations: A rise in improper parking or confusion among drivers can signal that markings are insufficiently visible.
- Recent Sealcoating or Repairs: After sealcoating or asphalt repairs, existing lines may be obscured, necessitating immediate restriping.
- Seasonal Weather Effects: In regions with harsh winters, snowplows and de-icing chemicals can wear down striping, making spring an ideal time for repainting.
Regularly monitoring these indicators ensures that your parking lot remains safe, compliant, and visually appealing throughout the year.
Common Mistakes to Avoid
Proper parking lot striping is essential for safety, compliance, and aesthetics. However, several common mistakes can compromise the quality and longevity of your striping efforts.
Painting on Dirty or Wet Surfaces
Applying paint to unclean or damp pavement can lead to poor adhesion, resulting in premature peeling and fading. Before striping, ensure the surface is thoroughly cleaned of dirt, debris, and oil stains. Use appropriate cleaning methods such as sweeping, pressure washing, or degreasers. Additionally, the pavement must be completely dry to allow the paint to bond effectively. Painting on wet surfaces can cause the paint to blister or not adhere properly, leading to unsatisfactory results.
Ignoring Line Width or Spacing Regulations
Adhering to standard dimensions for parking spaces and lines is crucial for functionality and legal compliance. Standard parking stall lines are typically 4 inches wide, while accessible parking stall lines should be at least 6 inches wide. The dimensions of parking spaces can vary based on local regulations, but a common standard is 9 feet wide by 18 feet long for regular spaces. Failing to comply with these standards can lead to inefficient use of space, driver confusion, and potential legal issues.
Using Low-Quality Paint to Cut Costs
Opting for inexpensive, low-quality paint may seem cost-effective initially but can result in higher maintenance costs over time. Low-quality paints are more susceptible to fading, chipping, and wear, especially under heavy traffic and harsh weather conditions. Investing in high-quality, durable paints designed specifically for pavement marking ensures longer-lasting results and reduces the frequency of restriping.
By avoiding these common mistakes, you can enhance the durability, safety, and appearance of your parking lot striping, ensuring a better experience for all users.
Cost Considerations and Budgeting
Understanding the costs associated with parking lot striping is essential for effective budgeting and maximizing your investment. This section outlines typical expenses, strategies to reduce long-term costs, and the return on investment (ROI) from regular maintenance.
Cost per Linear Foot or Stall
Parking lot striping costs can vary based on several factors, including the type of markings, paint used, and lot complexity. Here’s a breakdown of average costs:
- Standard Parking Stall Line: $4–$5 per line
- Handicapped/Accessible Stall: $25–$40 each
- Directional Arrow: $10–$30 each
- Stop Line/Bar: $10–$30 each
- Crosswalk: $35–$75 each
- Curb Painting: $0.75–$1.00 per linear foot
For a medium-sized lot (30–50 stalls), total striping costs typically range from $500 to $1,200, depending on the specific requirements and features included.
How to Reduce Long-Term Expenses
Implementing strategic measures can help minimize long-term striping expenses:
- Use High-Quality Paint: Investing in durable paints, such as thermoplastic or epoxy, can extend the lifespan of markings, reducing the frequency of restriping.
- Regular Maintenance: Routine cleaning and prompt repair of minor damages prevent deterioration, preserving the integrity of striping.
- Bundle Services: Combining striping with other maintenance tasks, like sealcoating, can lead to cost savings through bundled service discounts.
- Schedule During Off-Peak Seasons: Planning striping projects during periods of low demand may result in lower contractor rates and increased availability.
ROI of Regular Maintenance
Regular parking lot maintenance offers significant returns on investment:
- Enhanced Safety: Clear and well-maintained markings reduce the risk of accidents, protecting both pedestrians and vehicles.
- Improved Aesthetics: A freshly striped parking lot enhances curb appeal, positively influencing customer perceptions and potentially increasing patronage.
- Compliance and Liability Reduction: Adhering to ADA and local regulations through proper striping minimizes legal risks and potential fines.
- Cost Savings: Proactive maintenance prevents extensive repairs, leading to long-term financial savings.
Investing in regular striping maintenance not only preserves the functionality and appearance of your parking lot but also contributes to overall operational efficiency and customer satisfaction.
| Lot Size | Estimated Total Cost |
| 10–20 stalls | $200–$400 |
| 30–50 stalls | $500–$1,200 |
| 100+ stalls | $1,500–$3,000+ |
Note: Costs vary based on specific requirements, paint types, and regional pricing.
By understanding the cost factors and implementing strategic maintenance practices, you can effectively manage your parking lot striping budget while maximizing the longevity and effectiveness of your investment.
Legal and Accessibility Guidelines
ADA-Compliant Line Markings
The Americans with Disabilities Act (ADA) sets forth specific requirements for accessible parking spaces to accommodate individuals with disabilities:
- Standard Accessible Spaces: Must be at least 96 inches wide with an adjacent 60-inch-wide access aisle.
- Van-Accessible Spaces: Require a minimum width of 132 inches with a 60-inch-wide access aisle or 96 inches wide with a 96-inch-wide access aisle.
- Signage: Each accessible space must have a sign with the International Symbol of Accessibility mounted at least 60 inches above the ground.
- Surface Markings: Access aisles should be marked with diagonal lines to discourage parking in them.

These specifications ensure that parking spaces are usable and safe for individuals with mobility devices.
City-Specific Spacing Requirements
In Vancouver, BC, local bylaws may have additional requirements for parking lot design:
- Parking Stall Dimensions: Standard parking stalls are typically 2.6 meters wide, while accessible stalls must be at least 3.7 meters wide.
- Access Aisles: An adjacent access aisle of at least 1.5 meters in width is required for each accessible parking space.
- Signage and Markings: Accessible spaces must be clearly marked with appropriate signage and pavement markings.
It’s essential to consult the City of Vancouver’s Parking By-law No. 6059 and related design supplements to ensure full compliance.
Required Number of Accessible Stalls
The number of accessible parking spaces required depends on the total number of parking spaces in the lot:
| Total Parking Spaces | Minimum Accessible Spaces | Van-Accessible Spaces |
| 1–25 | 1 | 1 |
| 26–50 | 2 | 1 |
| 51–75 | 3 | 1 |
| 76–100 | 4 | 1 |
| 101–150 | 5 | 1 |
| 151–200 | 6 | 1 |
| 201–300 | 7 | 2 |
| 301–400 | 8 | 2 |
| 401–500 | 9 | 2 |
| 501–1000 | 2% of total spaces | 1 of every 6 accessible spaces |
| 1001 and over | 20 plus 1 for each 100 over 1000 | 1 of every 6 accessible spaces |
Note: At least one of every six accessible spaces must be van-accessible.
These requirements ensure that parking facilities are accessible to all individuals, including those who use vans equipped with lifts or ramps.
Adhering to both ADA standards and local regulations is essential for creating accessible and legally compliant parking facilities. Regular reviews and updates to parking lot striping can help maintain compliance and ensure safety for all users.
Eco-Friendly Options for Line Striping
As environmental concerns become increasingly important, adopting eco-friendly practices in parking lot maintenance is essential. This includes selecting sustainable materials and methods for line striping that minimize environmental impact without compromising quality or durability.
Low-VOC Paints and Coatings
Traditional traffic paints often contain high levels of volatile organic compounds (VOCs), which can contribute to air pollution and pose health risks. Opting for low-VOC or zero-VOC paints reduces these harmful emissions.
- BioStripe® by Aexcel Corporation: This soy-based, waterborne alkyd latex paint offers excellent durability and chemical resistance while maintaining low VOC levels (<85 g/L). It’s suitable for various applications, including roads, parking lots, and bike paths.
- TECHLINE® WB Zero VOC: Formulated by US Specialty Coatings, this water-based, high-solids traffic marking paint contains zero VOCs. It’s designed for use on roads, parking lots, and airport runways, providing crisp, durable lines.
Using these eco-friendly paints not only benefits the environment but also enhances worker safety by reducing exposure to harmful chemicals.
Reflective Materials That Reduce Light Pollution
Enhancing visibility in parking lots doesn’t have to come at the expense of the environment. Incorporating reflective materials can improve safety while minimizing light pollution.
- Reflective Pavements: Applying reflective coatings or using light-colored materials for pavement surfaces can increase visibility at night, reducing the need for excessive lighting. This approach helps lower energy consumption and minimizes light pollution.
- Proper Lighting Design: Utilizing fixtures with appropriate shielding and aiming them correctly ensures that light is directed where needed, reducing glare and preventing light from spilling into unintended areas.
By combining reflective materials with thoughtful lighting design, parking lots can achieve optimal visibility while preserving the night sky and reducing energy usage.
Implementing eco-friendly line striping options demonstrates a commitment to sustainability and can lead to long-term cost savings through reduced maintenance and energy expenses.
Should You DIY or Hire a Pro?
Deciding between tackling parking lot striping yourself or hiring a professional contractor depends on various factors, including the size of your lot, budget, desired quality, and compliance requirements. Understanding the pros and cons of each approach can help you make an informed decision.
Pros and Cons of DIY Striping
Pros:
- Cost Savings: DIY striping can be more affordable upfront, especially for small lots or minor touch-ups.
- Flexibility: You can work on your schedule without coordinating with contractors.
Cons:
- Equipment Investment: Purchasing or renting striping equipment can be costly.
- Quality Concerns: Achieving straight, uniform lines requires skill and experience.
- Compliance Risks: Lack of knowledge about ADA and local regulations can lead to non-compliance.
- Time-Consuming: DIY projects often take longer, potentially disrupting your business operations.
While DIY striping might seem appealing for minor touch-ups, the potential risks and long-term costs often outweigh the initial savings.
When It’s Best to Hire a Contractor
Hiring a professional striping contractor is advisable in the following scenarios:
- Large or Complex Lots: Professionals have the equipment and expertise to handle extensive or intricate layouts efficiently.
- Regulatory Compliance: Contractors are familiar with ADA requirements and local codes, ensuring your lot meets all necessary standards.
- Time Constraints: Professionals can complete the job quickly, minimizing downtime for your business.
- Quality Assurance: Experienced contractors deliver precise, durable, and aesthetically pleasing results.
If your parking lot has 100+ spaces or is regularly trafficked, you may be better off hiring a professional to stripe your lot.
What to Look for in a Striping Company
When selecting a striping contractor, consider the following factors:
- Experience and Reputation: Choose a company with a proven track record and positive customer reviews.
- Compliance Knowledge: Ensure they are well-versed in ADA guidelines and local regulations.
- Quality Materials: Inquire about the types of paint and equipment they use to guarantee durability.
- Detailed Estimates: Request a comprehensive quote outlining all services and costs.
- Insurance and Licensing: Verify that the contractor is properly insured and licensed to protect against potential liabilities.
A reputable striping company will provide clear estimates, use high-quality materials, and ensure compliance with all relevant regulations.
By carefully weighing the pros and cons of DIY versus professional striping and selecting a qualified contractor when necessary, you can maintain a safe, compliant, and visually appealing parking lot.
Preventive Maintenance Tips to Extend Line Life
Maintaining the clarity and durability of your parking lot striping is essential for safety, compliance, and aesthetics. Implementing a proactive maintenance strategy can significantly extend the lifespan of your line markings.
Routine Cleaning to Prevent Paint Wear
Regular cleaning is vital to preserve the visibility and adhesion of parking lot lines.
- Power Washing: Utilize high-pressure washing to remove dirt, oil, and debris that can degrade paint over time. This method is effective for both asphalt and concrete surfaces.
- Debris Removal: Consistently clear leaves, trash, and other debris to prevent accumulation that can obscure markings and lead to uneven wear.
- Oil Stain Treatment: Address oil and chemical spills promptly using appropriate cleaning agents to prevent paint deterioration.
Implementing a regular cleaning schedule helps maintain the brightness and effectiveness of your striping.
Visual Inspections and Quick Touch-Ups
Conducting regular inspections allows for early detection of wear and timely maintenance.
- Monthly Checks: Inspect lines for fading, chipping, or peeling. Early identification enables prompt touch-ups, preventing the need for complete restriping.
- Touch-Up Painting: Use handheld stripers or stencils for minor repairs to maintain line integrity and visibility.
- Documentation: Keep records of inspections and maintenance activities to track wear patterns and plan future upkeep.
Regular monitoring ensures that your parking lot remains safe and visually appealing.
Limit Vehicle Drift and Scuff Zones
Minimizing areas where vehicles frequently drift or scuff can reduce premature line wear.
- Traffic Flow Design: Design parking layouts to encourage smooth traffic flow, reducing sharp turns that cause tire scuffing.
- Physical Barriers: Install curbs or wheel stops to guide vehicles and prevent encroachment on line markings.
- Driver Signage: Use clear signage to direct drivers, minimizing confusion and erratic movements that can damage striping.
By addressing these factors, you can protect your line markings from unnecessary wear and extend their lifespan.
Implementing these preventive maintenance strategies will help ensure that your parking lot striping remains effective, compliant, and visually appealing for years to come.
Creating a Long-Term Maintenance Plan
Establishing a comprehensive, long-term maintenance plan for your parking lot striping is essential to ensure safety, compliance, and cost-effectiveness. A structured approach helps in anticipating maintenance needs, allocating budgets appropriately, and extending the lifespan of your parking lot markings.

Annual Review and Scheduling
Conducting an annual review of your parking lot’s condition allows for timely identification of wear and tear, ensuring that maintenance activities are scheduled proactively.
- Spring Inspection: Assess the impact of winter conditions, such as snowplow damage or salt-induced deterioration.
- Summer Maintenance: Ideal time for repainting lines due to favorable weather conditions that facilitate proper paint adhesion and curing.
- Fall Preparation: Address any issues before winter sets in, including sealing cracks and ensuring drainage systems are clear.
Regular inspections and timely maintenance help in preventing minor issues from escalating into major repairs.
Integrating Striping Into Your Facility Maintenance Budget
Allocating funds for parking lot striping within your facility’s maintenance budget ensures that resources are available when needed, avoiding unexpected expenses.
- Cost Estimation: Determine the frequency of restriping based on traffic volume and environmental factors to estimate annual costs accurately.
- Prioritization: Identify high-traffic areas that may require more frequent maintenance and allocate funds accordingly.
- Contingency Planning: Set aside a portion of the budget for unforeseen repairs or emergency maintenance needs.
Incorporating striping into your overall maintenance budget facilitates better financial planning and ensures the longevity of your parking lot infrastructure.
By implementing a structured maintenance plan and integrating it into your facility’s budget, you can maintain clear, compliant, and safe parking lot markings year-round.
Conclusion
Regular Maintenance Pays Off
Consistent upkeep of your parking lot striping is crucial for ensuring safety, maintaining compliance, and enhancing the overall appearance of your property. Regular maintenance not only extends the lifespan of your markings but also prevents costly repairs in the future.
Visibility, Compliance, and Professionalism Matter
Clear and well-maintained parking lines contribute to efficient traffic flow, reduce the risk of accidents, and demonstrate a commitment to professionalism. Moreover, adhering to local regulations and accessibility standards is essential to avoid potential fines and legal issues.
Don’t Wait—Create Your Striping Strategy Today
Proactive planning is key. Assess your parking lot’s current condition, schedule regular inspections, and allocate budget for maintenance activities. Whether you choose to handle striping in-house or hire professionals, having a strategic approach ensures your parking area remains functional and visually appealing.
FAQs
How long should I wait after sealcoating to apply striping?
It’s recommended to wait at least 48 hours after sealcoating before applying striping. This allows the sealant to cure properly, ensuring optimal adhesion of the paint. In humid or cooler conditions, waiting up to 72 hours may be necessary.
What’s the difference between thermoplastic and regular paint?
Thermoplastic markings are more durable and can last up to 7–8 years, making them ideal for high-traffic areas. They are applied using heat, which allows them to bond firmly to the pavement. Regular traffic paint, while more cost-effective initially, typically lasts 1–2 years and may require more frequent reapplication.
Do I need permits to repaint my lot in a commercial zone?
Permit requirements vary by location. In some jurisdictions, restriping without altering the existing layout may not require a permit. However, if you’re changing the design, adding new markings, or resurfacing, a permit might be necessary. It’s best to consult your local municipal regulations to determine specific requirements.
Is reflective striping worth the extra cost?
Reflective striping enhances visibility during nighttime and adverse weather conditions, improving safety for both drivers and pedestrians. While it may have a higher upfront cost, the added safety benefits often justify the investment, especially in areas with low lighting or high traffic.
How can I measure and lay out a new parking layout myself?
To lay out a new parking design:
- Measure the Area: Determine the dimensions of your parking lot.
- Plan the Layout: Decide on the type of parking (e.g., angled, perpendicular) and calculate the number of spaces.
- Mark Reference Points: Use chalk lines or string to outline the parking spaces.
- Use the 3-4-5 Triangle Method: This technique helps ensure right angles for accurate layout.
Apply the Paint: Once the layout is marked, use appropriate equipment to apply the striping.